
You can also download Adobe Photoshop CC Free Download.
How To Activate Adobe Products By Replace DLL File?
Hello, Guys! Today I will discuss here a simple and easy method to activate the Adobe product using the mentioned method. Graphics editing is one of the requirement nowadays. For that purpose, they need to edit the graphics, digital media, images, banners, etc. The tool people use for the editing purpose is Adobe product. The Adobe is one of the famous organization that is developing the graphics tool since 1988. They continuously update the product and add new features in it. That is the main reason the Adobe products are famous all around the world.
The method I am teaching you will work for all of the Adobe products if you find the appropriate DLL file for according to setup you installed. You just need to follow the simple steps to activate for a lifetime.
You can also download Adobe Photoshop CS6 Portable Free Download.
Step 1: You need to download the Adobe Photoshop or any Adobe product and then install that on your computer system. You can install by accepting the free trial version that works for 30 days properly.
Step 2: You need to find the.DLL file according to the version you installed in step one and download it. Also for step one you can go to home page of Onesoftwares and in the navigation menu, you will see the Adobe and its product listed below. Go and install that if not done the step one before. Keep the version of the installed graphics software in mind.
Search the .dll file for the version you installed. As we all know that the operating system has two architectural styles that are, 32 bit and 64 bit. Both structures have the different hierarchy of the file structure in the operating system installation folder.
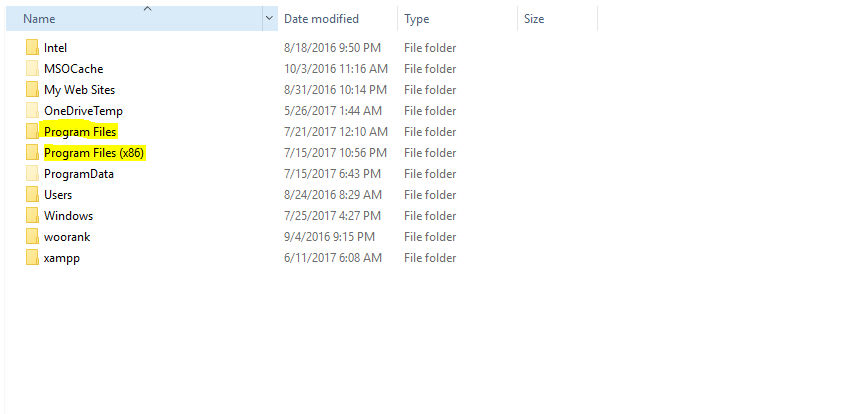
Step 3: After downloading the DLL file, You need to understand the file structure of 32 bit and 64 bit operating systems. Please see the image below, that has the 64-bit operating system installed. So It has two Program Files, First Program File that is 64 bit and the second Program Files(x86) that is 32 bit.
Step 4: See your operating system architecture(32 bit or 64 bit) and also you need to install the correct version of Adobe software.
You can also download Adobe Illustrator CC 2015 Free Download.
Step 5: I will here show you the 64-bit architecture example, Open the Program File folder in the folder you will see the Adobe Folder. As you can see in the image below.

Step 6: Open Adobe folder You will see the Adobe Products that are installed, I am going to show the example of Adobe Photoshop. So you can see the Adobe Photoshop CC 2015 Folder, open that folder. As you can see in the image below.


Step 8: Hurrah! You have successfully activated the Adobe Photoshop. Now close the folder and you can start the program. It will not ask for the activation. If you still have any issue/query you can ask freely in the comment box below.
You can also download Adobe Photoshop 7.0 Free Download.
This process taught only for the educational purpose. Also, the students can learn from this knowledge. We recommend everyone to purchase a proper product with full features. Also, That will help you a lot in the future also. Again this post is only for educational purpose.


Hi I can't find at FB or on that link from google drive
see on the right corner of this page you will see the facebook page link in side bar..!
I cant get to the facebook thing
I can get to you guy Facebook
Thanks for linking us on our facebook page….!
I fixed itAmtlib Dll with the help of your blog Thanks. Good Work