How to Create and Extract Zip Files to Specific Directory in Ubuntu
This guide provides step-by-step instructions and examples on how to create and extract zip files in specific directories using Ubuntu’s command line.
Installing Zip and Unzip Utilities
First, ensure you have the ‘zip’ and ‘unzip’ utilities installed:
sudo apt update
sudo apt install zip unzip
How to Create Zip File
Example 1: Basic Zip Command
Creating a zip file of a single directory:
zip -r myarchive.zip myfolder
In this example, ‘myfolder’ is the name of the folder you want to compress, and ‘myarchive.zip’ is the name you choose for the compressed file. You can name it anything, like ‘projectbackup.zip’.
Example 2: Zipping Multiple Directories
Creating a zip file from multiple directories:
zip -r combined.zip folder1 folder2
This command compresses ‘folder1’ and ‘folder2’ into a single zip file named ‘combined.zip’. It’s useful for consolidating multiple directories into one compressed file.
Example 3: Excluding Files
Creating a zip file while excluding certain files:
zip -r archive.zip folder1 -x "*.txt"
This command creates a zip file named ‘archive.zip’ from ‘folder1’ but excludes all ‘.txt’ files. It’s handy when you want to omit specific file types from your archive.
Example 4: Zip Files with Password Protection
Creating a password-protected zip file:
zip -r -e secure.zip folder_to_compress
Here, ‘folder_to_compress’ is compressed into ‘secure.zip’, which is protected with a password. You’ll be prompted to enter and verify the password. This method is essential for securing sensitive data.
How to Extract Zip File
Example 5: Basic Unzip Command
Extracting a zip file into the current directory:
unzip archive.zip
This command extracts the contents of ‘archive.zip’ into the current working directory. It’s the simplest form of extraction.
Example 6: Extracting to a Specific Directory
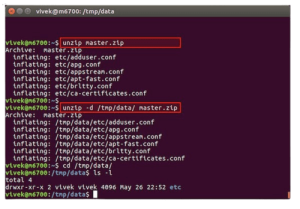
Extracting a zip file to a specific directory:
unzip archive.zip -d /path/to/destination
This command extracts ‘archive.zip’ into the specified directory ‘/path/to/destination’. It’s useful for organizing extracted contents in a specific location.
Example 7: Extracting Specific Files
Extracting specific files from a zip archive:
unzip archive.zip "folder1/*" -d /destination
This command extracts only the contents of ‘folder1’ from ‘archive.zip’ into the ‘/destination’ directory. It’s helpful when you need only a part of the archive.
Example 8: Listing Contents of Zip File
Listing the contents of a zip files without extracting:
unzip -l archive.zip
This command lists all the files contained in ‘archive.zip’ without extracting them. It’s a quick way to view the contents of an archive.
Ubuntu OS Server, renowned for its stability and efficiency in server environments, offers a wide array of tools for file management, among which the ‘zip’ and ‘unzip’ commands are particularly noteworthy. You can visit Ubuntu site for commands to learn basics. These commands provide users with a straightforward yet powerful way to handle zip files, a common format for data compression and archiving. Whether you’re a system administrator managing server backups, a developer handling code deployments, or just someone looking to organize files efficiently, mastering these commands is essential.
The ability to create and extract zip files on Ubuntu Server not only streamlines file management but also enhances data transfer processes, making it easier to handle large files or groups of files. This guide aims to empower users of Ubuntu Server with the knowledge to effectively use these tools, enhancing their overall file management strategies.
Understanding the nuances of the ‘zip’ and ‘unzip’ commands in Ubuntu can significantly impact your workflow. For instance, creating zip files isn’t just about reducing file size; it’s also about securing sensitive data with password protection and customizing the compression process to suit specific needs. Similarly, the ‘unzip’ command is more than just extraction; it offers options to selectively extract files, view contents without extraction, and maintain directory structures, ensuring that users have full control over the process.
These capabilities are particularly beneficial in server environments where batch processing of files and directories is common. By following the examples and instructions provided in this guide, Ubuntu Server users can leverage these commands to optimize their file management, ensuring efficient, secure, and organized handling of data in various server tasks and operations. If you have deleted files you can visit how to recover deleted files.
Conclusion
These examples cover various scenarios for creating and extracting zip files in Ubuntu. With these commands, you can efficiently manage zip archives in your daily tasks.
![How to Setup OutLook 2013 Account Gmail [IMAP/POP]](https://nomisoftwares.com/wp-content/uploads/2013/09/How-to-Setup-OutLook-2013-Account-Gmail-IMAP-POP.png)